
| Home | Carin's first page | Index of animation topics |
by Pedro Faria Lopes
| Home | Carin's first page | Index of animation topics |
ADETTI / ISCTE, Av. das Forcas Armadas, 1600 Lisboa, Portugal, (Pedro.Lopes@iscte.pt)
There are basically two approaches to computer animation: 2D (keyframing or painting) and 3D. As an expressive medium, 3D animation is more suitable for realism, even if recently J. Lasseter and others showed it is possible to apply it to caricature (Toy Story, Bug's Life, Antz), while 2D animation is stronger for actual caricature.18, 19, 20 These two approaches replicate the traditional animation techniques. The work described in this text searches for new ways of expression, in particular a new computer animation paradigm is presented and developed.
There was first a basic question: Is there any other motion and image synthesis technique(s) that could be simulated and/or automated by computer? This lead to the study of traditional animation techniques existing today.1, 18, 19 From this study, and also based on my experience in traditional animation,21, 22 I found that, among all available animation techniques, there was one which enabled very particular and artistic results. Unfortunately, it is a difficult technique, and today, as far as I know, there is only one animator using it at the National Film Board of Canada. This technique, called pinscreen, was invented by Alexandre Alexeieff and Claire Parker between 1930 and 1935. Their goal was to build a system where one could produce images that, when animated, could resemble engraved pictures in motion.19, 23, 24 Very few artists used the pinscreen animation technique. The explanation is that, in spite of the creative possibilities, it is a very time consuming technique and not a very easy one to deal with.1, 19, 23
The pinscreen device is made of several hundred thousand headless pins arranged in an uniformly perforated frame, one pin per perforation. The frame is lit from an oblique angle and image synthesis is based in the shadows the pins cast, depending on how far each pin is pressed from beyond the frame. Images are created with gray shade levels, enabling animations that resemble engravings in motion to be created. Images and films done with the pinscreen are classified by the artists involved as dramatic and poetic.
I decided to simulate the pinscreen technique by computer with the following basic goals:
The following information was collected during a visit to the National Film Board of Canada, Montreal, and research done at Chateau d´Annecy, Atelier d´Animation d´Annecy, Centre International du Cinema d´Animation and Bibliotèque de la Cinemateche Française, Paris. I used also information available in Brevet d´Invention nş 792340 by Claire Parker.23
![]()
The pinscreen technique is based on a white plate standing upright in a frame, approximately A3 format or bigger. The plate is uniformly perforated by small holes containing headless metal pins inserted perpendicularly to the surface, one per hole, each pin able to slide easily through its own hole. The holes can be distributed either with simple or crossed piling (Figure 1).
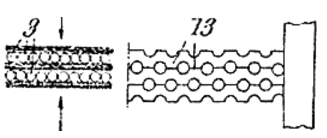
Figure 1. Types of piling on a traditional pinscreen: simple piling (left) and crossed piling (right).23
Figure 2 shows the physical structure of a traditional pinscreen as presented by McLaren.25 It is built using an external structure and calibration screws that operate a pressure bar. The interior zone defined by the external structure and pressure bar is filled with small white tubes, all with the same length, cross piled (see detail window on Figure 2). In the interior of each tube, a pin is introduced. The pressure bar compresses the tubes against each other, enabling the calibration of the pinscreen, ie., controlling the ease with which the pins slide along the tubes. These tubes form a platform that, seen from a certain distance, appears to be a white plate.
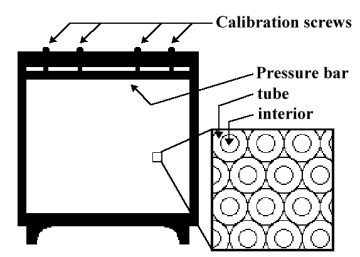
Figure 2. Physical structure of the traditional pinscreen.
Depending on the size, a pinscreen may be composed from 80,000 to one million pins. The pins are longer than the thickness of the plate. This means that each pin or group of pins can be pushed in the back surface of the plate emerging in the front surface. The reverse operation is also possible. Both surfaces are lit at an angle by spotlights, one per surface.
![]()
The image creation in the pinscreen is based on the shadows the pins cast over the white surface, enabling the synthesis of black and white images with intermediate grey levels. Figure 3 shows an amplified model of a fraction of the pinscreen used to demonstrate the shading process.
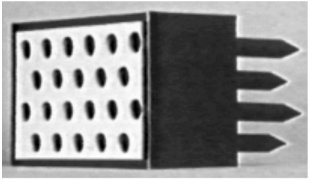
Figure 3. Amplified model of a fraction of the pinscreen.
Let us assume that we are looking at the front surface. When the pins are not emerging from the surface, no shadows are cast, and the surface appears white. If one of the pins is pushed from behind, its shadow will be cast on the white surface. The further the pin is pushed, the longer the shadow (Figure 4).
Figure 4. Amplified model with an emerging pin.
Instead of a pin, one can push a group of pins. Suppose we did it only halfway. The shadows cast will appear with white spaces between them, and a medium gray tone will be obtained (Figure 5). If the pins are fully pushed, the shadow of each pin will overlap that of its neighbor. No light will reach the white surface, and a black tone is formed. The back surface shows the reverse effect, acting as a negative.
Figure 5. Amplified model with pins emerging halfway.
To animate images on the pinscreen, an image is synthesized using several tools to manipulate groups of pins, on both surfaces, until the desired gray tones are achieved to form the picture. This picture is photographed onto a frame of movie film. The next frame is obtained by slight modifications on the first image on the same pinscreen according to the desired motion. The complete animated film is a collection of images that were gradually and incrementally produced, each one based on the previous image.1, 19, 24
![]()
According to Claire Parker, the modeling and shading in the system "makes it possible to work the entire film in chiaroscuro, and thus to escape from the comic or satiric into the poetic and dramatic"1, pp. 95. Few animators used the technique, and few films were produced with it. Alexeieff and Parker made a total of six films with this technique.19 There are few pinscreens in the world ,and one of them is at the National Film Board of Canada, Montreal, used by Jacques Drouin. One of his films, Mindscape, is considered an "example of the expressiveness of the medium".5
Why are there so few pinscreens, and so few animators using the technique? Does the poetic and dramatic effect not attract artists? One of the problems is related to the frame construction. The underlying technique is simple and one pin is small, light and inexpensive, but multiply it by one million, and it becomes a huge, heavy, and expensive apparatus.*
Another problem is that it is not an easy task to work with a pinscreen. Apart from the way pins are manipulated to produce a specific image, the major difficulty arises from the fact that it is almost impossible to exactly reproduce a given frame in an animated sequence. This means that an error in one frame can easily ruin all the work involved in a complete animation sequence. A great amount of scene preparation, care and dedication are needed to produce a complete film using this technique.24
Even if errors are avoided, the animation in itself is a tremendous task. Imagine the animation of an animal moving in a landscape. Each time the animal is moved, the portion of landscape that shows up has to be redrawn as accurately as possible, because the scenario is supposed to be frozen during the action.
One way to avoid the full animation of a character, and hence, diminish the amount of work involved, is achieved with the use of dissolves (in camera or with future laboratory work). A dissolve is an effect where an image disappears (fade-out) while at the same time the next one appears (fade-in). A half second dissolve requires only two images while full animation in the same period would require at least six images, each filmed twice.
Up to this point, we have seen how traditional pinscreen animation works, the kind of results achieved with it, and why so few artists use this technique. In the next section, the model of a virtual pinscreen is presented.
![]()
The basic questions we face are:
The pinscreen device is made of opaque pins, light source and white surface. Its underlying technique is a typical problem of casting shadows over a surface, which can be solved using raytracing. I used a general purpose public domain raytracer:26 the pins were modeled as opaque cylinders placed vertically on a white polygon. The raytracer produced the expected shadows but, as I expected from the beginning, this approach is limited and only suitable for tests. One problem is the time spent to render the image, even when the number of pins are limited to ten or twenty. The number of primitives supported by the raytracer is also a problem. A pinscreen is formed by hundreds of thousands of pins and the raytracer doesn't support this number of primitives. The software could be modified to extend this limit, but the time spent in rendering would be prohibitively high. This means that we must search for a practical computer approach with a rapid computation of shadows, that allows the animator to use the program interactively, as in the real pinscreen.
Kochanek5 considers the pinscreen the first analog framebuffer with a "resolution" (number of pins) similar to the pixel resolution found in modern 512 x 384 framebuffers. From one side we have an analog buffer, and on the other side a digital buffer. The question is: how can they be matched? What are the fundamental items in the pinscreen that form the image? The spotlight, the pins and the white surface serve to produce the elements responsible for the image synthesis: the shadows and the white spaces in between. The basic computer model, first introduced in 1990,24 only has to consider the minimum set of items that will simulate shadows. As a consequence, we can identify the light and the white surface as elements to be supported in the model. The light can be modeled either as a parallel ray or point light source.
What about the pins? In the real pinscreen, physical opaque pins interfere with light producing the shadows. In the computer model there is no need for a physical simulation. We only need each the position, height and thickness of each pin to calculate its cast shadow.
Another important question is: how are the positions of the pins are distributed over the surface? One thing is certain: there are moments when white spaces must be seen among the shadows so that intermediate gray tones can be synthesized. This means that, for a particular image, the denser the positions of the pins, the darker the image, and vice versa. In the computer model, density is controlled through the distance between pins, measured in multiples of pin thickness.
Thus, the basic computer model must support:
In this approach, the main goal is to process the minimum amount of information in order to simulate the maximum number of pins per unit time. Two different applications come to mind: pin animation (as explained in section 3.5) and building a graphic editor with tools simulating the traditional pinscreen (presented in section 4).
In the vector oriented approach, the thickness of a pin is approximated to the size of a pixel. As a consequence, the shadow each pin casts can be processed as a 2D black vector. Using a vector oriented visualization pipeline, this approximation is important in obtaining a good performance in the model.
I followed a very simple procedure to visualize the model. Providing that the frame buffer is initialized to white (simulation of the white surface) the following algorithm is applied:
For each virtual pin:
Tests were made with a black & white digitized image with 512 x 512 pixel resolution. For each pixel of the source image, a virtual pin was assigned, its height being inversely proportional to the gray value of the pixel (dark pixels are assigned long pin values, and vice versa).
Different virtual pin densities were tried, from one to three pixel intervals. The resulting images, if compared with the original digitized one, lost definition and contrast, as was easily predictable. The point is that they are not comparable, because the reproducing media are different and the final goals are opposite: pinscreen is really intended to reproduce "chiaroscuro" images and, depending on the available resolution, more or less precise reproductions.
Nevertheless, computer modeled pinscreen resolution is a problem with the digital frame buffers of today. A 1024 x 768 pixel resolution digital frame buffer enables a pinscreen with 512 x 384 pin resolution, considering one pin interval between virtual pins. This gives a total of less than 200,000 pins, still a low resolution. To model the best traditional pinscreen available (one million pins), it would require a digital frame buffer with 2300 x 1740 pixel resolution. There are already digital film recorders that can record images up to 4000 x 4000 resolution, but for interactive use, this resolution is not yet available.
The images obtained in the digital pinscreen with the present available resolution show a typical "dotted" appearance, as seen in a traditional pinscreen with equivalent resolution. This fact confirms that the model works. Nevertheless, one should find a more objective test to enable an irrefutable conclusion. The test explained next is based on the following steps:
We can anticipate, by deduction, what kind of image the test generates. First of all, it is necessary to analyse the piling distribution of the pins over the surface. In Section 2 (Figure 1), we saw that Alexeieff and Parker proposed two possible types of piling: simple and crossed.23 The traditional pinscreens they built used crossed piling (the juxtaposition of tubes with pins inside). If we try to find the lines of escape for the light in such a structure, we will see a six pointed star (Figure 6). This prediction is corroborated by an experiment done by Alexeieff:25 he puts a lamp in front of the traditional pinscreen producing an image like the one in Figure 7 where a six pointed star is perceptible.
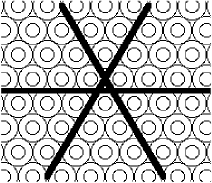
Figure 6. Escape lines of light in a crossed piling, producing a six pointed star.
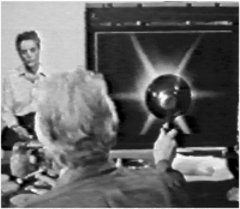
Figure 7. Lamp in front of a traditional pinscreen with all pins emerging: a six pointed star is formed.25
When building the software that implements the digital pinscreen, I followed the simple piling approach because it was easier to code the algorithms. From the analyses of such a piling we can deduce that an eight pointed star will be formed (Figure 8). Using a point light source on the digital pinscreen generates an image with a main eight pointed star and a secondary star with the same number of points (Figure 9). This effect occurs because in the vector approach, the shadow lines are drawn with aliasing.
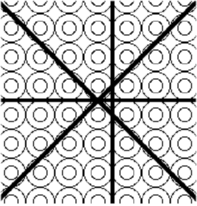
Figure 8. Escape lines of light in a simple piling producing an eight pointed star.
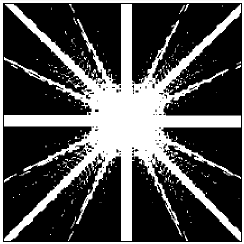
Figure 9. Star vector generated with the computer pinscreen model showing eight main points and eight secondary points due to aliasing.
From the above tests, we can conclude that the pinscreen model works, but aliasing must be eliminated if we want a perfect image. While the vector approach is interesting because it is a quick method of visualizing the idea, for the final visualization, an antialiased approach must be used, which will be covered in the next section.
![]()
In this approach, the main goal is to produce images with a good final quality using antialiasing. In the vector implementation, pins were approximated to the thickness of a pixel; in this case, there is no such restriction. The implemented algorithm calculates the colour of each pixel using oversampling: it can be described as follows:
1. For each pixel:
a) Create shadow polygon list with the pins that cover the pixel
i) For each subpixel:
(1) for each pin on the list:
(a) mark if subpixel is inside shadow polygon
(2) average colour of subpixels
The same star test was applied to this new approach, obtaining the image on Figure 10. An eight pointed star is evident, as predicted in the previous section, which definitely validates the model. The thickness of the star's "rays" can even be deduced, as shown in the image.
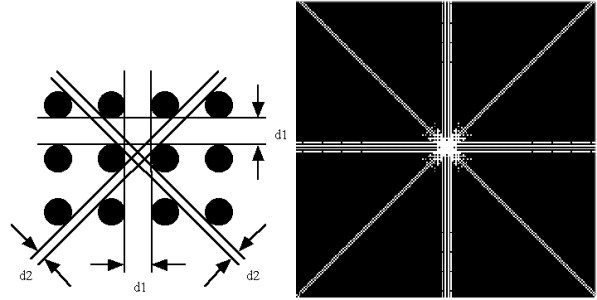
Figure 10. Deduction and results: an eight pointed star is generated when antialiasing is used in the computer pinscreen model.
Based in the model previously described, a digital pinscreen system was developed. When compared to the traditional pinscreen, the digital approach offers several advantages manly related to automation, an area where computers excel.
As in the first tests, the user can begin an image synthesis session with any kind of digital image already in mass storage. Any subsequent changes can be easily recorded so that, at any time, any of the intermediate image states can be recovered. This approach can be generalized, and the method of traditional pinscreen animation has much to gain from, using image by image synthesis. Any image of a given animation sequence can be recovered and manipulated, saving time and, most of all, avoiding the loss of the entire animated sequence, as often happens in the traditional method when an error occurs in the animation.
Using a fast hardware pipeline, it is also possible to show any sequence of images in real time for playback purposes, a feature absolutely impossible in the traditional method.
The digital pinscreen has also another advantage: each image does not need to be recorded just after completion. This can be done later under computer control. This creates a time saving because recording can be done without the animator being present and also because, if needed, it can be repeated in an error free manner.
![]()
Now some important extensions to this computer model are described. These extensions contemplate two new parameters to be added: colour and time.
![]()
In the basic model, only the position of the light was supported. The general model also supports a specification for the colour of the light. This means that instead of gray levels from white to black, the images can be synthesized with shades of a given colour, as a result of the interaction between the white surface and the coloured light. This is similar to experiments Jacques Drouin is doing at National Film Board of Canada, when he interposes coloured filters between the light source and the pinscreen.
In the basic model, only a white surface was supported. The general model supports also a coloured surface, as it was the case for the light. This means that the shades result now from the interaction between a coloured light and a coloured surface. To get this effect in the traditional pinscreen is difficult, if not impossible.
Alexeieff suggests1 that a coloured pinscreen can be obtained using three thinner pins instead of one. This idea gives rise to problems if further developed. First of all, the number of pins to be manipulated would be three times greater: if it is already difficult to build, for instance, a board with one million pins, imagine how difficult it would be to build one with three million.
In the digital pinscreen, the inclusion of colour is very simple: it is enough to consider the RGB value of each pin and draw a vector with this colour instead of black, assuming the pin is 100% transparent. The physical realization of the coloured digital model could be based on pins made of a transparent theoretical substance, like liquid crystal with colour properties controlled by an electric current.
![]()
When taking into account the time component, several new extensions are added to the basic model.
Colour and position of the light source can smoothly change in time, which is difficult to achieve in the traditional method, but used in other approaches to computer animation. Colour changing in time can also be applied to the surface and to the pins.
Changing the height of the pins in time introduces a new animation algorithm, pin interpolation, unique to the digital approach. In a standard pinscreen, pins are manipulated as groups and there cannot be any manipulation of individual pins. Even if single pin manipulation were attempted, it would be almost impossible to get any significant results, due to device limitations. However, single virtual pin manipulation is possible because it is done under program control. The user might not directly use this feature because, as in the traditional pinscreen, the significance of a single pin in the overall image is low, but this capability is important when considering an algorithmic approach, like pin interpolation.
Pin interpolation works with the following principle: given any two different sets of virtual pin heights, the system can calculate any intermediate set, or sequence of sets, by pin to pin height interpolation. This effect is not possible with a traditional pinscreen.
Now the general animation methodology in the digital pinscreen can be presented: given any number of digital pinscreen images (set of pin heights and colour, position and colour of light, colour of surfaces) the system calculates all the intermediate sets through any kind of interpolation (spline, linear, cinematic...) of the parameters that define a set.
![]()
An editor was developed, inspired in the way traditional pinscreen works. The main idea is to provide a workbench for animators, enabling them to work directly with the digital pinscreen.
In the traditional pinscreen, there are normally two persons working: the one in the front surface (fs) is the main actuator (ma) and the other in the back surface (bs), the secondary actuator (sa), does adjustments and corrections in the heights of the pins. To create an image, the sa uses a roll to set all the pins to emerge fully from the surface, creating a uniform black tone (Figure 11).

Figure 11. Roller for manipulation of pins in the traditional pinscreen.23
After the black surface is created, the ma uses different instruments to press the pins and create gray shades. Instruments can be narrower rolls or spoons, rings, and even nested Russian dolls25 that can be used to "excavate" textures on the pinscreen. Any object can be used, provided it has a rigid and more or less smooth surface. If the pressure is too much, the sa will correct the error, pressing in the same region in the back surface. This is a demanding task, and correcting the error may require the use of the roll to clean the area so a new attempt can be made with less pressure.
The pinscreen editor avoids the need of a second person: all tools can be applied with positive or negative pressure, pushing or attracting the pins. The editor is inspired by digital paint systems allowing a set of typical commands that are applied over the heights of the pins: manipulation of groups of pins (cut, copy, paste, clear) and drawing of primitives (sketch, line, polygon, ellipse, rectangle) with different attributes (height, thickness, fill area of pins). Other possibilities include dual sense pressure tools (positive and negative pressure) for local instantaneous corrections, light source orientation control and incremental save of the parameters that define an image for later interpolation. The development environment used was a Silicon Graphics workstation with OSF Motif toolkit.
![]()
In the present text, the traditional pinscreen technique has been described with its possibilities and difficulties. An extended computer model for pinscreen simulation, including colour and time extensions has also been proposed. The results achieved show its viability. The advantages of the digital approach are enormous when compared with the traditional one. The resolution of the current frame buffers resolution provide only small to medium digital pinscreen resolutions, depending on the density parameter of the pins. Nevertheless, this already enables interesting graphic results.
The main research work described here took place between 1989 and 1995. This technique was invited to the exhibition at Chateau d'Annecy, France, organized to commemorate the Centennial of the invention of cinema/animation, during the animation film festival in Annecy, 1995.
Currently, we plan to port the Pin Editor to the PC Windows environment. At the end of this text, some images done with the Pin Editor are shown.
![]()
I am grateful to Junta Nacional de Investigação Científica e Tecnológica who partially financed this work, project nş PMCT/C/TIT/442/90. Several people helped with information about the traditional pinscreen: Manuel Carvalho Baptista (Clube Micro-Cine), Abi (Animatógrafo), Doris Kochanek (National Film Board of Canada), José Xavier and Pièrre Lambert (Simples Images), Maurice Corbet (Musée du Chateau d´Annecy), J.-François Camus (Centre International du Cinema d´Animation), Nicole Salomon (Atelier d´Animation d´Annecy), Cecile Starr (Alexeieff´s distributer in the USA) and Svetlana Alexeieff Rockwell (Alexeieff´s daughter). I also would like to express my gratitude to Tom Nadas and Prof. Peter Comninos for comments of an earlier version of this work, to the referees and participants of the Eurographics Workshop on Computer Animation and Simulation (1990) for their comments and suggestions. Last but not least, thank you to Z. Cavalheiro, J. Martinot and J. Xavier who designed some images and used the Pin Editor, to Luciana Porcher Nedel, who coded some of the algorithms, and to M. Setas and J. Calhariz, who coded parts of the Pinscreen Editor.
![]()
The following two images are from sequences done for "Palavras de Pessoa", a film by J. Xavier and P.F. Lopes financed for pre-production by Instituto Português de Cinema.
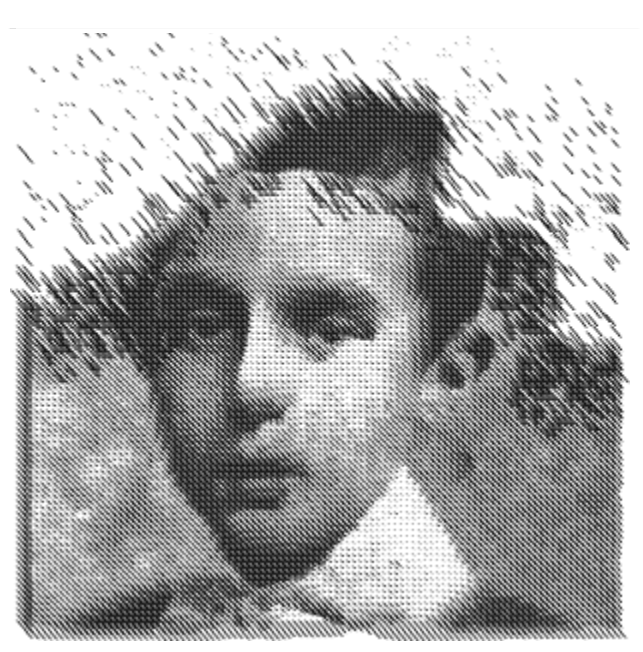
Frame 1 (linked to larger image)
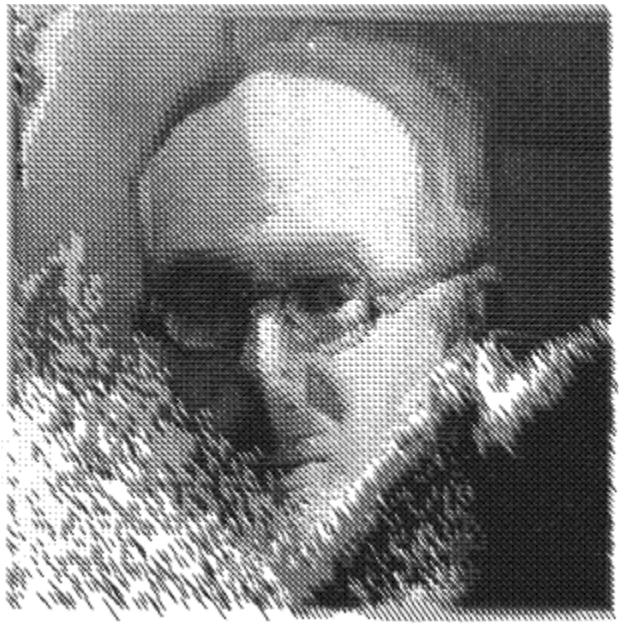
Frame 2 (linked to larger image)
*While doing experiments with traditional animation, I tried to build a pinscreen with spaghetti bars as pins. To avoid frustration to others, let me say that this does not work: spaghetti is too fragile and not opaque enough, in spite of being lighter than metal pins. |
|
©1999, Pedro Faria Lopes. All rights reserved. For permission to copy or use any material on this page, please email Carin Perron at carin@writer2001.com. No permission is required for fair use, which includes short quotations in other work with citation. For information on citation of Internet sources using the Harvard System, see Library - BRIDGES: Harvard System - Electronic Material. |
| Top | Principles of Animation | Index of animation topics | Carin's first page | Home |